Summary #
- You may recall SOL is the 'native token' of Solana. All other tokens, fungible and non-fungible tokens (NFTs), are called SPL Tokens.
- The Token Program contains instructions for creating and interacting with SPL Tokens.
- Token Mints are accounts that define a specific token. This includes information about the token itself (like how many decimals it has), the account allowed to mint more tokens (called the mint authority), and where to find more information about the token like a description, image, etc. The mint authority can use the token mint to make more tokens!
- Token Accounts hold tokens of a specific Token Mint. For most users, their balances of each token mint are stored in Associated Token Accounts - accounts with addresses made from their wallet address and the token's mint.
- Creating Token Mints and Token Accounts requires allocating rent in SOL. The rent for a Token Account can be refunded when the account is closed. Additionally, tokens created with the Token Extensions Program can also close Token Mints.
Lesson #
The Token Program is one of many programs made available by the Solana Program Library (SPL). It contains instructions for creating and interacting with SPL Tokens. These tokens represent all non-native (i.e. not SOL) tokens on the Solana network.
This lesson will focus on the basics of creating and managing a new SPL Token using the Token Program:
- Creating a new Token Mint
- Creating Token Accounts
- Minting
- Transferring tokens from one holder to another
We'll be approaching this from the client side of the development process using
the @solana/spl-token Javascript library.
Token Mint #
To create a new SPL Token you first have to create a Token Mint. A Token Mint is an account that holds data about a specific token.
As an example, let's look at
USD Coin (USDC) on the Solana Explorer.
USDC's Token Mint address is EPjFWdd5AufqSSqeM2qN1xzybapC8G4wEGGkZwyTDt1v.
With the explorer, we can see the particular details about USDC's Token Mint
such as the current supply of tokens, the addresses of the mint and freeze
authorities, and the decimal precision of the token:
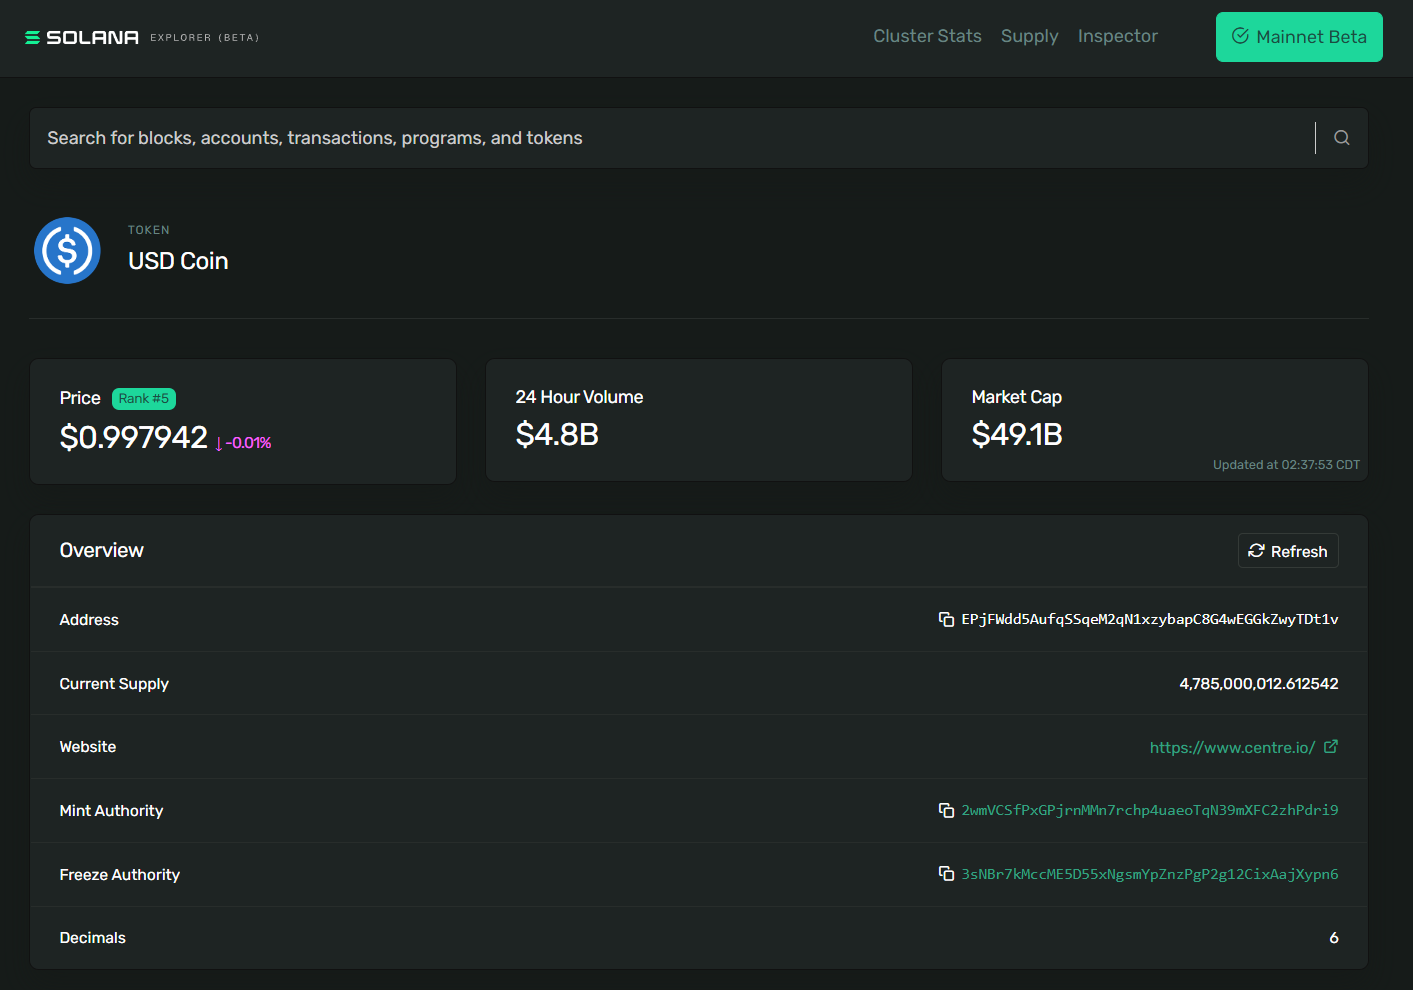 USDC Token Mint
To create a new Token Mint, you need to send the right transaction instructions
to the Token Program. To do this, we'll use the createMint function from
@solana/spl-token.
const tokenMint = await createMint(
  connection,
  payer,
  mintAuthority,
  freezeAuthority,
  decimal,
);
The createMint function returns the publicKey of the new token mint. This
function requires the following arguments:
connection- the JSON-RPC connection to the clusterpayer- the public key of the payer for the transactionmintAuthority- the account that is authorized to do the actual minting of tokens from the token mint.freezeAuthority- an account authorized to freeze the tokens in a token account. If freezing is not a desired attribute, the parameter can be set to nulldecimals- specifies the desired decimal precision of the token
When creating a new mint from a script that has access to your secret key, you
can simply use the createMint function. However, if you were to build a
website to allow users to create a new token mint, you would need to do so with
the user's secret key without making them expose it to the browser. In that
case, you would want to build and submit a transaction with the right
instructions.
Under the hood, the createMint function is simply creating a transaction that
contains two instructions:
- Create a new account
- Initialize a new mint
This would look as follows:
import * as web3 from "@solana/web3.js";
import * as token from "@solana/spl-token";

async function buildCreateMintTransaction(
  connection: web3.Connection,
  payer: web3.PublicKey,
  decimals: number,
): Promise<web3.Transaction> {
  const lamports = await token.getMinimumBalanceForRentExemptMint(connection);
  const accountKeypair = web3.Keypair.generate();
  const programId = token.TOKEN_PROGRAM_ID;

  const transaction = new web3.Transaction().add(
    web3.SystemProgram.createAccount({
      fromPubkey: payer,
      newAccountPubkey: accountKeypair.publicKey,
      space: token.MINT_SIZE,
      lamports,
      programId,
    }),
    token.createInitializeMintInstruction(
      accountKeypair.publicKey,
      decimals,
      payer,
      payer,
      programId,
    ),
  );

  return transaction;
}
When manually building the instructions to create a new token mint, make sure you add the instructions for creating the account and initializing the mint to the same transaction. If you were to do each step in a separate transaction, it's theoretically possible for somebody else to take the account you create and initialize it for their own mint.
Rent and Rent Exemption #
Note that the first line in the function body of the previous code snippet
contains a call to getMinimumBalanceForRentExemptMint, the result of which is
passed into the createAccount function. This is part of account initialization
called rent exemption.
Until recently, all accounts on Solana were required to do one of the following to avoid being deallocated:
- Pay rent at specific intervals
- Deposit enough SOL upon initialization to be considered rent-exempt
Recently, the first option was done away with and it became a requirement to deposit enough SOL for rent exemption when initializing a new account.
In this case, we're creating a new account for a token mint so we use
getMinimumBalanceForRentExemptMint from the @solana/spl-token library.
However, this concept applies to all accounts and you can use the more generic
getMinimumBalanceForRentExemption method on Connection for other accounts
you may need to create.
Token Account #
Before you can mint tokens (issue new supply), you need a Token Account to hold the newly issued tokens.
A Token Account holds tokens of a specific "mint" and has a specified "owner" of the account. Only the owner is authorized to decrease the Token Account balance (transfer, burn, etc.) while anyone can send tokens to the Token Account to increase its balance.
You can use the spl-token library's createAccount function to create the new
Token Account:
const tokenAccount = await createAccount(
  connection,
  payer,
  mint,
  owner,
  keypair,
);
The createAccount function returns the publicKey of the new token account.
This function requires the following arguments:
connection- the JSON-RPC connection to the clusterpayer- the account of the payer for the transactionmint- the token mint that the new token account is associated withowner- the account of the owner of the new token accountkeypair- this is an optional parameter for specifying the new token account address. If no keypair is provided, thecreateAccountfunction defaults to a derivation from the associatedmintandowneraccounts.
Please note that this createAccount function is different from the
createAccount function shown above when we looked under the hood of the
createMint function. Previously we used the createAccount function on
SystemProgram to return the instruction for creating all accounts. The
createAccount function here is a helper function in the spl-token library
that submits a transaction with two instructions. The first creates the account
and the second initializes the account as a Token Account.
Like with creating a Token Mint, if we needed to build the transaction for
createAccount manually we could duplicate what the function is doing under the
hood:
- Use
getMintto retrieve the data associated with themint - Use
getAccountLenForMintto calculate the space needed for the token account - Use
getMinimumBalanceForRentExemptionto calculate the lamports needed for rent exemption - Create a new transaction using
SystemProgram.createAccountandcreateInitializeAccountInstruction. Note that thiscreateAccountis from@solana/web3.jsand used to create a generic new account. ThecreateInitializeAccountInstructionuses this new account to initialize the new token account
import * as web3 from "@solana/web3.js";
import * as token from "@solana/spl-token";

async function buildCreateTokenAccountTransaction(
  connection: web3.Connection,
  payer: web3.PublicKey,
  mint: web3.PublicKey,
): Promise<web3.Transaction> {
  const mintState = await token.getMint(connection, mint);
  const accountKeypair = await web3.Keypair.generate();
  const space = token.getAccountLenForMint(mintState);
  const lamports = await connection.getMinimumBalanceForRentExemption(space);
  const programId = token.TOKEN_PROGRAM_ID;

  const transaction = new web3.Transaction().add(
    web3.SystemProgram.createAccount({
      fromPubkey: payer,
      newAccountPubkey: accountKeypair.publicKey,
      space,
      lamports,
      programId,
    }),
    token.createInitializeAccountInstruction(
      accountKeypair.publicKey,
      mint,
      payer,
      programId,
    ),
  );

  return transaction;
}
Associated Token Accounts #
An Associated Token Account stores tokens in an address made from:
- The owner's public key
- The token mint
For example, Bob's USDC is stored in an Associated Token Account made from Bob's public key, and the USDC mint address.
Associated Token Accounts provide a deterministic way to find the Token Account
owned by a specific publicKey for a specific token.
There are other ways to create token accounts (particularly for onchain programs), but nearly all the time you want to store tokens for a user, you'll want it to be an Associated Token Account. Even if the user doesn't already have an ATA for that token, you can simply find the address and make the account for them.
 ATAs are PDAs
You can create an associated token account using the spl-token library's
createAssociatedTokenAccount function.
const associatedTokenAccount = await createAssociatedTokenAccount(
  connection,
  payer,
  mint,
  owner,
);
This function returns the publicKey of the new associated token account and
requires the following arguments:
connection- the JSON-RPC connection to the clusterpayer- the account of the payer for the transactionmint- the token mint that the new token account is associated withowner- the account of the owner of the new token account
You can also use getOrCreateAssociatedTokenAccount to get the Token Account
associated with a given address or create it if it doesn't exist. For example,
if you were writing code to airdrop tokens to a given user, you'd likely use
this function to ensure that the token account associated with the given user
gets created if it doesn't already exist.
Under the hood, createAssociatedTokenAccount is doing two things:
- Using
getAssociatedTokenAddressto derive the associated token account address from themintandowner - Building a transaction using instructions from
createAssociatedTokenAccountInstruction
import * as web3 from "@solana/web3.js";
import * as token from "@solana/spl-token";

async function buildCreateAssociatedTokenAccountTransaction(
  payer: web3.PublicKey,
  mint: web3.PublicKey,
): Promise<web3.Transaction> {
  const associatedTokenAddress = await token.getAssociatedTokenAddress(
    mint,
    payer,
    false,
  );

  const transaction = new web3.Transaction().add(
    token.createAssociatedTokenAccountInstruction(
      payer,
      associatedTokenAddress,
      payer,
      mint,
    ),
  );

  return transaction;
}
Mint Tokens #
Minting tokens is the process of issuing new tokens into circulation. When you mint tokens, you increase the supply of the token mint and deposit the newly minted tokens into a token account. Only the mint authority of a token mint is allowed to mint new tokens.
To mint tokens using the spl-token library, you can use the mintTo function.
const transactionSignature = await mintTo(
  connection,
  payer,
  mint,
  destination,
  authority,
  amount,
);
The mintTo function returns a TransactionSignature that can be viewed on the
Solana Explorer. The mintTo function requires the following arguments:
connection- the JSON-RPC connection to the clusterpayer- the account of the payer for the transactionmint- the token mint that the new token account is associated withdestination- the token account that tokens will be minted toauthority- the account authorized to mint tokensamount- the raw amount of tokens to mint outside of decimals, e.g. if Scrooge Coin mint's decimals property was set to 2 then to get 1 full Scrooge Coin you would need to set this property to 100
It's not uncommon to update the mint authority on a token mint to null after the tokens have been minted. This would set a maximum supply and ensure no tokens can be minted in the future. Conversely, minting authority could be granted to a program so tokens could be automatically minted at regular intervals or according to programmable conditions.
Under the hood, the mintTo function simply creates a transaction with the
instructions obtained from the createMintToInstruction function.
import * as web3 from "@solana/web3.js";
import * as token from "@solana/spl-token";

async function buildMintToTransaction(
  authority: web3.PublicKey,
  mint: web3.PublicKey,
  amount: number,
  destination: web3.PublicKey,
): Promise<web3.Transaction> {
  const transaction = new web3.Transaction().add(
    token.createMintToInstruction(mint, destination, authority, amount),
  );

  return transaction;
}
Transfer Tokens #
SPL Token transfers require both the sender and receiver to have token accounts for the mint of the tokens being transferred. The tokens are transferred from the sender's token account to the receiver's token account.
You can use getOrCreateAssociatedTokenAccount when obtaining the receiver's
associated token account to ensure their token account exists before the
transfer. If the account doesn't exist already, this function will create it and
the payer on the transaction will be debited the lamports required for the
account creation.
Once you know the receiver's token account address, you transfer tokens using
the spl-token library's transfer function.
const transactionSignature = await transfer(
  connection,
  payer,
  source,
  destination,
  owner,
  amount,
);
The transfer function returns a TransactionSignature that can be viewed on
the Solana Explorer. The transfer function requires the following arguments:
connection- the JSON-RPC connection to the clusterpayer- the account of the payer for the transactionsource- the token account sending tokensdestination- the token account receiving tokensowner- the account of the owner of thesourcetoken accountamount- the number of tokens to transfer
Under the hood, the transfer function simply creates a transaction with the
instructions obtained from the createTransferInstruction function:
import * as web3 from "@solana/web3.js";
import * as token from "@solana/spl-token";

async function buildTransferTransaction(
  source: web3.PublicKey,
  destination: web3.PublicKey,
  owner: web3.PublicKey,
  amount: number,
): Promise<web3.Transaction> {
  const transaction = new web3.Transaction().add(
    token.createTransferInstruction(source, destination, owner, amount),
  );

  return transaction;
}
Lab #
We're going to use the Token Program to create a Token Mint, create an Associated Token Account, mint tokens, transfer tokens, and burn tokens.
Assuming you already have a .env file with a SECRET_KEY setup per
Cryptography fundamentals.
npm i @solana/web3.js@1 @solana/spl-token @solana-developers/helpers@2 esrunCreate the Token Mint #
Create an empty file called create-token-mint.ts. After loading our keypairs,
we'll call createMint(), setting our user as the payer, mintAuthority,
and freezeAuthority.
Think of the token mint as the factory that makes tokens. Our user, as the
mintAuthority is the person that runs the factory.
import { createMint } from "@solana/spl-token";
import "dotenv/config";
import {
  getKeypairFromEnvironment,
  getExplorerLink,
} from "@solana-developers/helpers";
import { Connection, clusterApiUrl } from "@solana/web3.js";

const connection = new Connection(clusterApiUrl("devnet"));

const user = getKeypairFromEnvironment("SECRET_KEY");

console.log(
  `🔑 Loaded our keypair securely, using an env file! Our public key is: ${user.publicKey.toBase58()}`,
);

// This is a shortcut that runs:
// SystemProgram.createAccount()
// token.createInitializeMintInstruction()
// See https://www.soldev.app/course/token-program
const tokenMint = await createMint(connection, user, user.publicKey, null, 2);

const link = getExplorerLink("address", tokenMint.toString(), "devnet");

console.log(`✅ Finished! Created token mint: ${link}`);
Run the script using npx esrun create-token-mint.ts. You should see
✅ Finished! Created token mint: https://explorer.solana.com/address/HYeUCAqdsQBkqQNHRoBPov42QySDhwM7zAqiorToosbz?cluster=devnetOpen up Solana Explorer and look at your new token!
Remember the address of the mint! We'll use this later.
Make some token metadata #
You'll notice our token account does not have a pretty symbol and shows up as 'Unknown Token' in Explorer. That's because our token has no metadata! Let's add some.
We'll use the Metaplex mpl-token-metadata Program, version 2. This is the most
popular version of mpl-token-metadata and saves significant complexity
compared to the newer version 3.
npm i @metaplex-foundation/mpl-token-metadata@2Create a new file called create-token-metadata.ts
// This uses "@metaplex-foundation/mpl-token-metadata@2" to create tokens
import "dotenv/config";
import {
  getKeypairFromEnvironment,
  getExplorerLink,
} from "@solana-developers/helpers";
import {
  Connection,
  clusterApiUrl,
  PublicKey,
  Transaction,
  sendAndConfirmTransaction,
} from "@solana/web3.js";
import { createCreateMetadataAccountV3Instruction } from "@metaplex-foundation/mpl-token-metadata";

const user = getKeypairFromEnvironment("SECRET_KEY");

const connection = new Connection(clusterApiUrl("devnet"));

console.log(
  `🔑 We've loaded our keypair securely, using an env file! Our public key is: ${user.publicKey.toBase58()}`,
);

const TOKEN_METADATA_PROGRAM_ID = new PublicKey(
  "metaqbxxUerdq28cj1RbAWkYQm3ybzjb6a8bt518x1s",
);

// Substitute in your token mint account
const tokenMintAccount = new PublicKey("YOUR_TOKEN_MINT_ADDRESS_HERE");

const metadataData = {
  name: "Solana Training Token",
  symbol: "TRAINING",
  // Arweave / IPFS / Pinata etc link using metaplex standard for offchain data
  uri: "https://arweave.net/1234",
  sellerFeeBasisPoints: 0,
  creators: null,
  collection: null,
  uses: null,
};

const metadataPDAAndBump = PublicKey.findProgramAddressSync(
  [
    Buffer.from("metadata"),
    TOKEN_METADATA_PROGRAM_ID.toBuffer(),
    tokenMintAccount.toBuffer(),
  ],
  TOKEN_METADATA_PROGRAM_ID,
);

const metadataPDA = metadataPDAAndBump[0];

const transaction = new Transaction();

const createMetadataAccountInstruction =
  createCreateMetadataAccountV3Instruction(
    {
      metadata: metadataPDA,
      mint: tokenMintAccount,
      mintAuthority: user.publicKey,
      payer: user.publicKey,
      updateAuthority: user.publicKey,
    },
    {
      createMetadataAccountArgsV3: {
        collectionDetails: null,
        data: metadataData,
        isMutable: true,
      },
    },
  );

transaction.add(createMetadataAccountInstruction);

const transactionSignature = await sendAndConfirmTransaction(
  connection,
  transaction,
  [user],
);

const transactionLink = getExplorerLink(
  "transaction",
  transactionSignature,
  "devnet",
);

console.log(`✅ Transaction confirmed, explorer link is: ${transactionLink}`);

const tokenMintLink = getExplorerLink(
  "address",
  tokenMintAccount.toString(),
  "devnet",
);

console.log(`✅ Look at the token mint again: ${tokenMintLink}`);
Replace YOUR_TOKEN_MINT_ADDRESS_HERE with your address of the mint and run the
script using npx esrun create-token-metadata.ts.
You'll now see Solana Explorer is updated, showing the token's name and symbol on the mint!
Note that Solana Explorer will display a warning like:
Warning! Token names and logos are not unique. This token may have spoofed its name and logo to look like another token. Verify the token's mint address to ensure it is correct.
This warning is accurate - indeed anyone can make any token have any symbol or name they like. However for your reference, if you are making an original token that becomes very well known, Solana Explorer uses a whitelist based on the Unified Token List API.
Create an Associated Token Account to store the tokens #
Now that we've created the mint, let's create a new Associated Token Account so that someone can store our tokens. This Associated Token Account could be for our wallet (if we, as the token mint authority, want to mint tokens to our address) or anyone else we know with a devnet wallet!
Create an empty file called create-token-account.ts. Then use
getOrCreateAssociatedTokenAccount() to get an associated token account based
on a wallet and our mint address, making the account if it needs to.
Remember to substitute in your token mint address below!
import { getOrCreateAssociatedTokenAccount } from "@solana/spl-token";
import "dotenv/config";
import {
  getExplorerLink,
  getKeypairFromEnvironment,
} from "@solana-developers/helpers";
import { Connection, PublicKey, clusterApiUrl } from "@solana/web3.js";
const connection = new Connection(clusterApiUrl("devnet"));

const user = getKeypairFromEnvironment("SECRET_KEY");

console.log(
  `🔑 Loaded our keypair securely, using an env file! Our public key is: ${user.publicKey.toBase58()}`,
);

// Substitute in your token mint account from create-token-mint.ts
const tokenMintAccount = new PublicKey("YOUR_TOKEN_MINT");

// Here we are making an associated token account for our own address, but we can
// make an ATA on any other wallet in devnet!
// const recipient = new PublicKey("SOMEONE_ELSES_DEVNET_ADDRESS");
const recipient = user.publicKey;

const tokenAccount = await getOrCreateAssociatedTokenAccount(
  connection,
  user,
  tokenMintAccount,
  recipient,
);

console.log(`Token Account: ${tokenAccount.address.toBase58()}`);

const link = getExplorerLink(
  "address",
  tokenAccount.address.toBase58(),
  "devnet",
);

console.log(`✅ Created token Account: ${link}`);
Run the script using npx esrun create-token-account.ts. You should see:
✅ Success! Created token account: https://explorer.solana.com/address/CTjoLdEeK8rk4YWYW9ZqACyjHexbYKH3hEoagHxLVEFs?cluster=devnetOpen the token account in Solana Explorer. Look at the owner - it's the account you made the ATA for! The balance will be zero, as we haven't sent any tokens there yet. Let's mint some tokens there and fix that!
Remember the address of your token account ! We'll use it to mint tokens.
Mint Tokens #
Now that we have a token mint and a token account, let's mint tokens to the
token account. Recall that we set the user as the mintAuthority for the
mint we created.
Create an empty file called mint-tokens.ts. Then uses the spl-token function
mintTo() to mint tokens. Remember to substitute in your token mint address and
token account address below!
import { mintTo } from "@solana/spl-token";
import "dotenv/config";
import {
  getExplorerLink,
  getKeypairFromEnvironment,
} from "@solana-developers/helpers";
import { Connection, PublicKey, clusterApiUrl } from "@solana/web3.js";
const connection = new Connection(clusterApiUrl("devnet"));

// Our token has two decimal places
const MINOR_UNITS_PER_MAJOR_UNITS = Math.pow(10, 2);

const user = getKeypairFromEnvironment("SECRET_KEY");

// Substitute in your token mint account from create-token-mint.ts
const tokenMintAccount = new PublicKey("YOUR_TOKEN_MINT_ACCOUNT");

// Substitute in your own, or a friend's token account address, based on the previous step.
const recipientAssociatedTokenAccount = new PublicKey(
  "RECIPIENT_TOKEN_ACCOUNT",
);

const transactionSignature = await mintTo(
  connection,
  user,
  tokenMintAccount,
  recipientAssociatedTokenAccount,
  user,
  10 * MINOR_UNITS_PER_MAJOR_UNITS,
);

const link = getExplorerLink("transaction", transactionSignature, "devnet");

console.log(`✅ Success! Mint Token Transaction: ${link}`);
Run the script using npx esrun mint-tokens.ts. You should see:
✅ Success! Mint Token Transaction: https://explorer.solana.com/tx/36U9ELyJ2VAZSkeJKj64vUh9cEzVKWznESyqFCJ92sj1KgKwrFH5iwQsYmjRQDUN2uVhcbW8AVDsNaiNuPZ7n9m4?cluster=devnetOpen Explorer, and see the transaction and the new tokens in the recipient's account!
Transfer Tokens #
Next, let's transfer some of the tokens we just minted using the spl-token
library's transfer function. You can
add a second account on devnet
if you like, or find a friend who has a devnet account and send them your token!
As you saw in Explorer, the tokens currently reside in an Associated Token
Account attached to our wallet. We don't have to remember the address for our
associated token account - we can just look it up using
getOrCreateAssociatedTokenAccount() and provide our wallet address and the
mint of the token we want to send. Likewise, we can find (or make) an ATA for
our recipient to hold this token too.
Create an empty file called transfer-tokens.ts. Then replace
YOUR_RECIPIENT_HERE with your recipient public key and replace
YOUR_TOKEN_MINT_ADDRESS_HERE with your token mint address.
import "dotenv/config";
import {
  getExplorerLink,
  getKeypairFromEnvironment,
} from "@solana-developers/helpers";
import { Connection, PublicKey, clusterApiUrl } from "@solana/web3.js";
import { getOrCreateAssociatedTokenAccount, transfer } from "@solana/spl-token";
const connection = new Connection(clusterApiUrl("devnet"));

const sender = getKeypairFromEnvironment("SECRET_KEY");

console.log(
  `🔑 Loaded our keypair securely, using an env file! Our public key is: ${sender.publicKey.toBase58()}`,
);

// Add the recipient public key here.
const recipient = new PublicKey("YOUR_RECIPIENT_HERE");

// Substitute in your token mint account
const tokenMintAccount = new PublicKey("YOUR_TOKEN_MINT_ADDRESS_HERE");

// Our token has two decimal places
const MINOR_UNITS_PER_MAJOR_UNITS = Math.pow(10, 2);

console.log(`💸 Attempting to send 1 token to ${recipient.toBase58()}...`);

// Get or create the source token account to store this token
const sourceTokenAccount = await getOrCreateAssociatedTokenAccount(
  connection,
  sender,
  tokenMintAccount,
  sender.publicKey,
);

// Get or create the destination token account to store this token
const destinationTokenAccount = await getOrCreateAssociatedTokenAccount(
  connection,
  sender,
  tokenMintAccount,
  recipient,
);

// Transfer the tokens
const signature = await transfer(
  connection,
  sender,
  sourceTokenAccount.address,
  destinationTokenAccount.address,
  sender,
  1 * MINOR_UNITS_PER_MAJOR_UNITS,
);

const explorerLink = getExplorerLink("transaction", signature, "devnet");

console.log(`✅ Transaction confirmed, explorer link is: ${explorerLink}`);
Run the script using npx esrun transfer-tokens.ts. You should see:
✅ Transaction confirmed, explorer link is: https://explorer.solana.com/tx/SgV2j2DkaErYf7ERiB11USoZzGqAk8HPEqVJLP8HWdz9M61FSFgyEMXJycHQtfCooCAPBom7Vi3akEAwSUHQUsu?cluster=devnetOpen the Explorer link. You see your balance go down, and the recipient's balance go up!
Challenge #
Now it's your turn to build something independently. Create an application that allows a user to create a new mint, create a token account, and mint tokens.
To interact with the Token Program using the wallet adapter, you will have to build each transaction and then submit the transaction to the wallet app for approval.
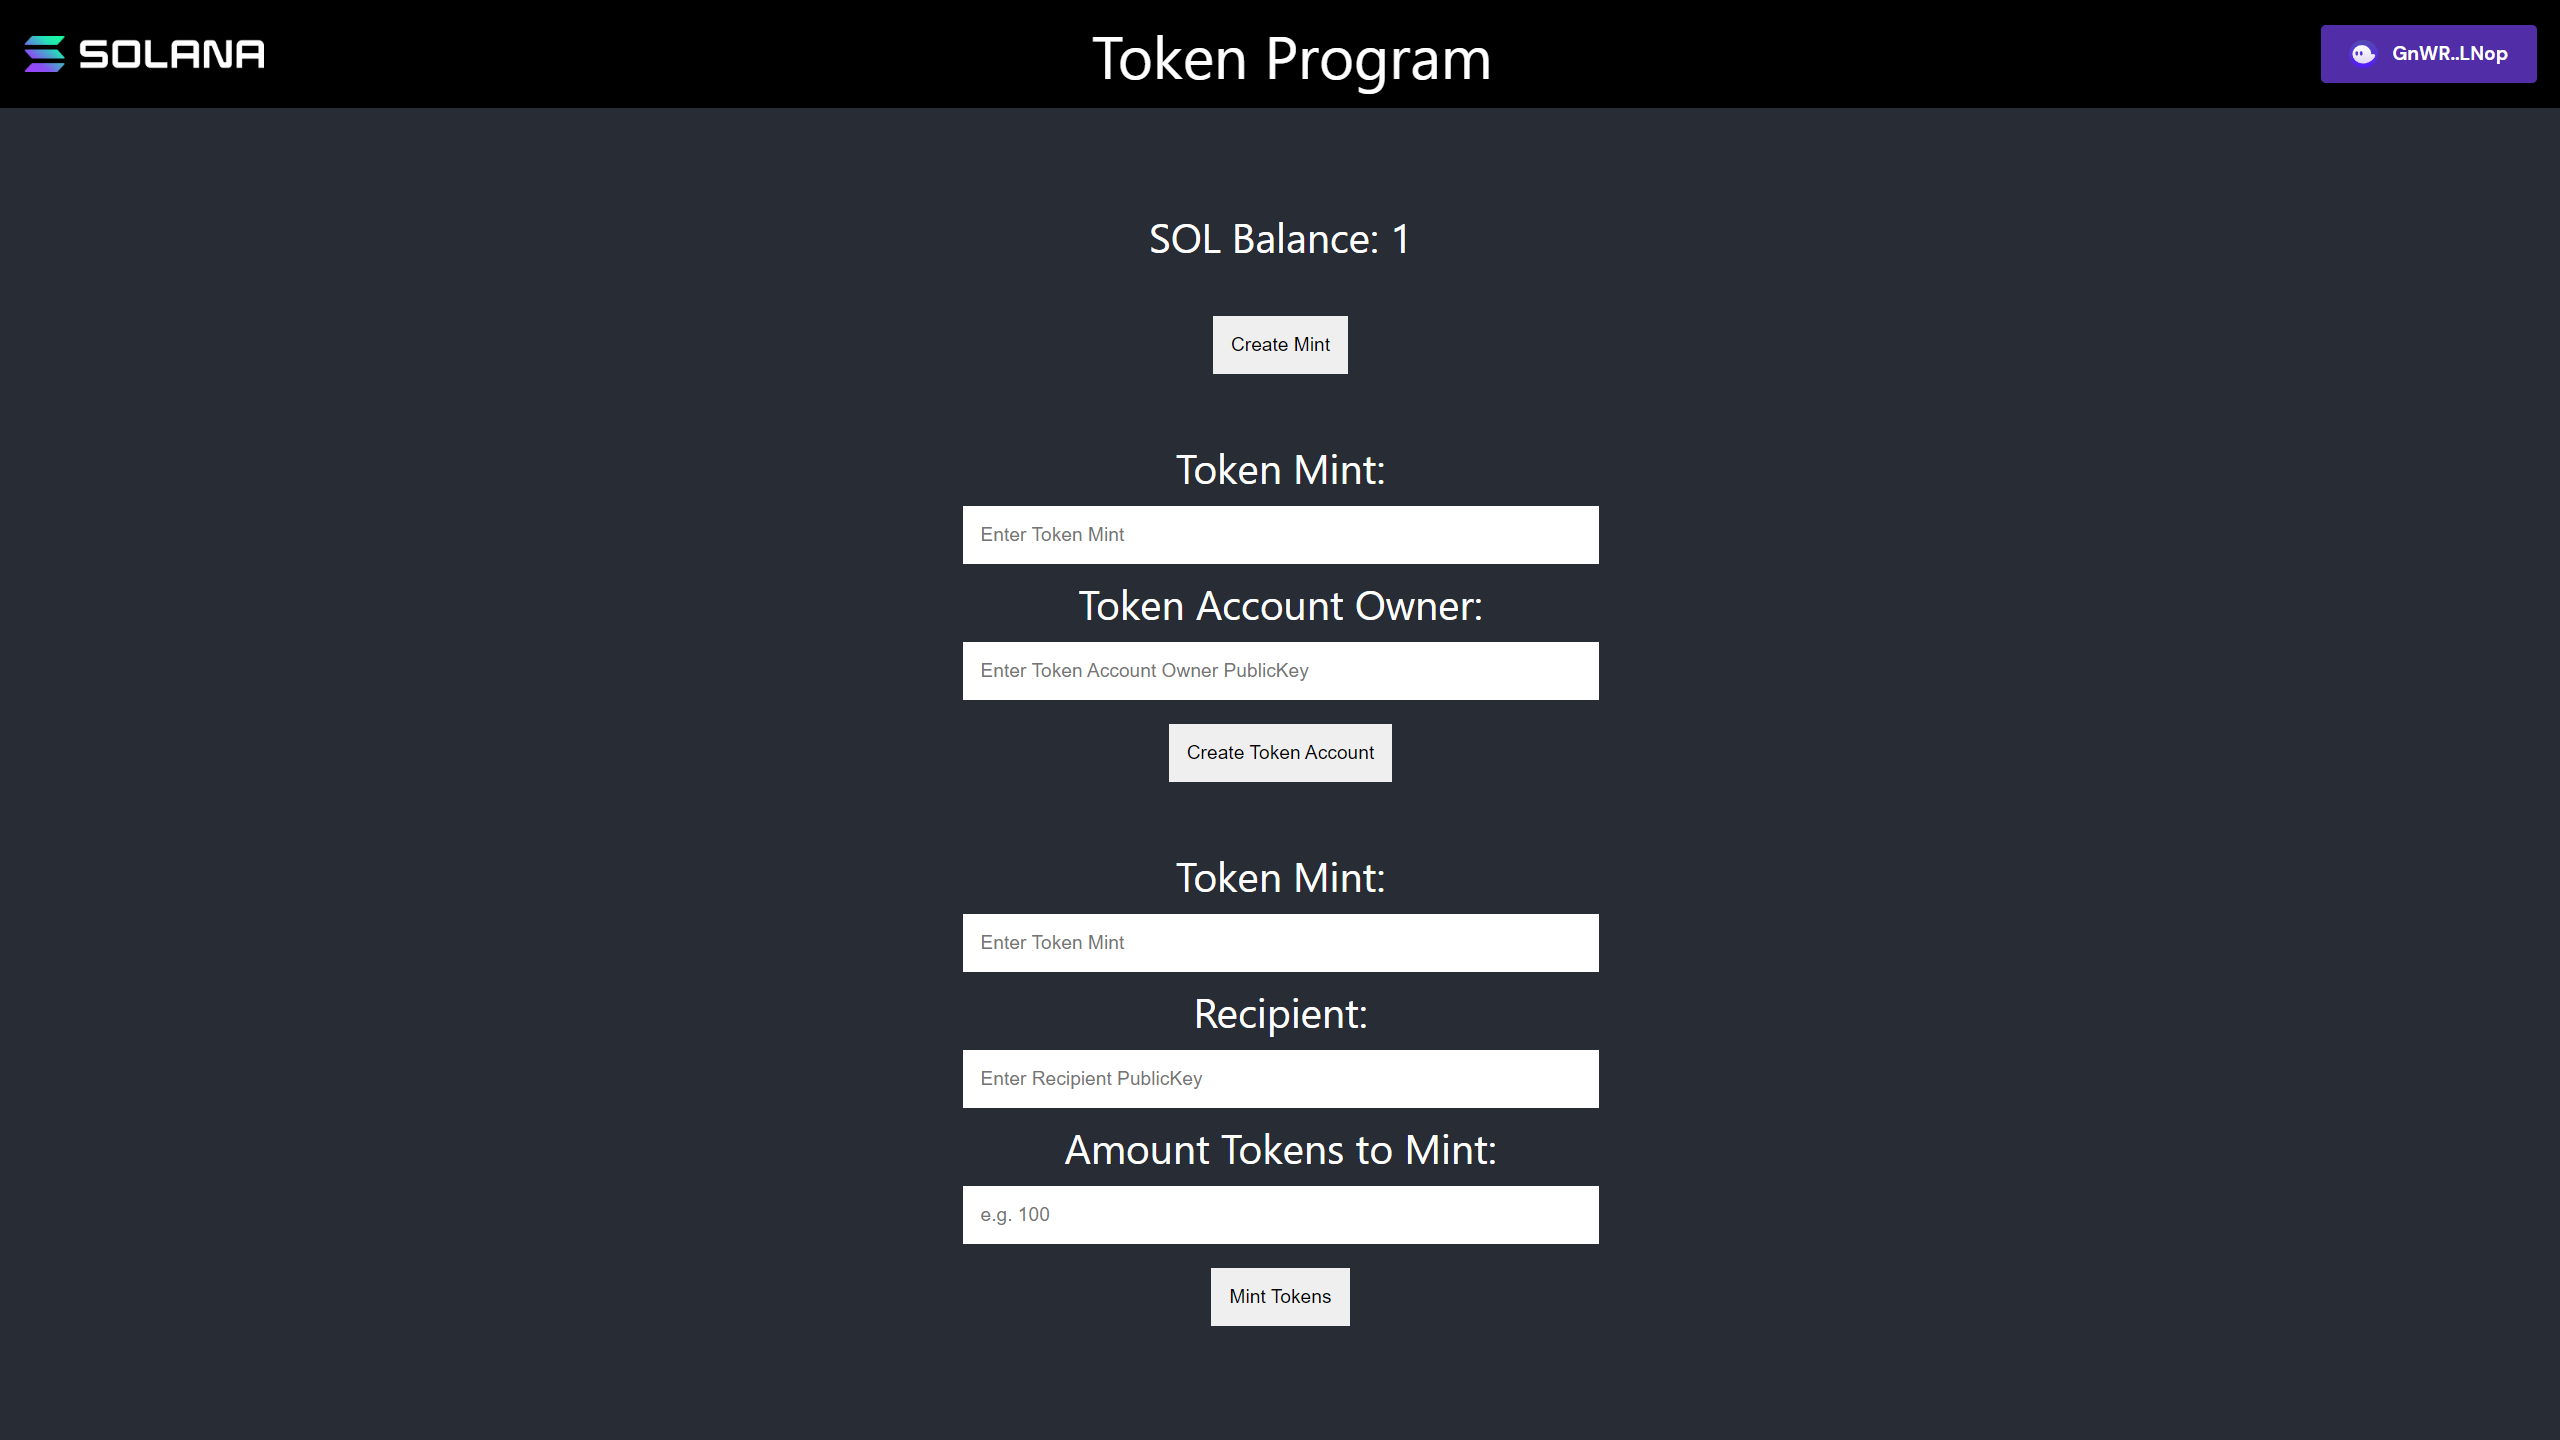 Token Program Challenge Frontend
- You can build this from scratch or you can download the starter code.
- Create a new Token Mint in the
CreateMintcomponent. If you need a refresher on how to send transactions to a wallet for approval, have a look at the Wallets lesson.
When creating a new mint, the newly generated Keypair will also have to sign
the transaction. When additional signers are required in addition to the
connected wallet, use the following format:
sendTransaction(transaction, connection, {
  signers: [Keypair],
});- Create a new Token Account in the
CreateTokenAccountcomponent. - Mint tokens in the
MintToFormcomponent.
If you get stumped, feel free to reference the solution code.
And remember, get creative with these challenges and make them your own!