Summary #
- Non-Fungible Tokens (NFTs) are SPL Tokens with an associated metadata account, 0 decimals, and a maximum supply of 1
- Metadata attaches additional properties to token mints (both NFTs and regular tokens). For NFTs, metadata includes the token name and a link to an offchain JSON file. This JSON file contains links to artwork and other media files, any special traits the NFT has, and more.
- The Metaplex Token Metadata program is an onchain program that attaches
metadata to a token mint. We can interact with the Token Metadata program
using the
metaplex-foundation/jsnpm module, also known as the Metaplex JavaScript SDK.
Lesson #
Solana Non-Fungible Tokens (NFTs) are SPL tokens created using the Token program. These tokens, however, also have an additional metadata account associated with each token mint.
In this lesson, we'll cover the basics of how NFTs are represented on Solana,
how to create and update them using the mpl-token-metadata npm module.
NFTs on Solana #
An NFT is a standard token from the Token Program with the following characteristics:
- Has 0 decimals, so it cannot be divided into parts
- Comes from a token mint with a supply of 1, so only 1 of these tokens exists
- Comes from a token mint whose authority is set to
null(to ensure that the supply never changes) - Has an associated account that stores metadata - things like a name, symbol, images, etc.
While the first three points can be achieved with the SPL Token Program, the associated metadata requires an additional program. This is the Metadata program.
The Metaplex Token Metadata program #
The most popular way Solana NFTs have been created is by using the Metaplex Token Metadata program.
 Metadata
-
When creating an NFT, the Token Metadata program creates an onchain metadata account using a Program Derived Address (PDA) with the token mint as a seed. This allows the metadata account for any NFT to be located deterministically using the address of the token mint. The onchain metadata contains a URI field that points to an offchain
.jsonfile. -
The offchain metadata in the JSON file stores the link to the media (images, videos, 3D files) of the NFT, any traits the NFT may have, and additional metadata (see this example JSON file). Permanent data storage systems such as Arweave are often used to store the offchain component of NFT metadata.
In the following sections, we'll cover the basics of using the
metaplex-foundation/js npm module (also known as the Metaplex JavaScript SDK)
to prepare assets, create NFTs, update NFTs, and associate an NFT with a broader
collection. For more information on metaplex-foundation/js see the
Metaplex JavaScript SDK README and
the
Metaplex JS SDK Examples.
The Metaplex Foundation has newer mechanisms to create NFTs, including Umi and MPL Core but Metaplex JavaScript SDK remains the simplest and most popular JS/TS client to create NFTs with broad wallet support.
Metaplex instance #
A Metaplex instance serves as the entry point for accessing the Metaplex SDK.
This instance accepts a connection used to communicate with the cluster.
Additionally, developers can customize the SDK's interactions by specifying an
"Identity Driver" and a "Storage Driver".
The Identity Driver is a keypair that can be used to sign transactions, which is
a requirement when creating an NFT. The Storage Driver is used to specify the
storage service you want to use for uploading assets. The irysStorage driver
is the default option, and it uploads assets to Irys, a permanent and
decentralized storage service.
Below is an example of how you can set up the Metaplex instance for devnet.
const metaplex = Metaplex.make(connection)
  .use(keypairIdentity(user))
  .use(
    irysStorage({
      address: "https://devnet.irys.xyz",
      providerUrl: "https://api.devnet.solana.com",
      timeout: 60000,
    }),
  );
Upload assets #
Before creating an NFT, you must prepare and upload any assets you plan to associate with the NFT. While this doesn't have to be an image, most NFTs have an image associated with them.
Preparing and uploading an image involves converting the image to a buffer,
converting it to the Metaplex format using the toMetaplexFile function, and
finally uploading it to the designated Storage Driver.
The Metaplex SDK supports the creation of a new Metaplex file from either files
present on your local computer or those uploaded by a user through a browser.
You can do the former using readFileSync() to read the image file, then
convert it into a Metaplex file using toMetaplexFile(). Finally, use your
Metaplex instance to call storage().upload(file) to upload the file. The
function's return value will be the URI where the image was stored.
const buffer = readFileSync("src/" + nftData.imageFile);
const file = toMetaplexFile(buffer, nftData.imageFile);
const imageUri = await metaplex.storage().upload(file);
Upload metadata #
After uploading an image, it's time to upload the offchain JSON metadata using
the nfts().uploadMetadata() function. This will return a URI where the JSON
metadata is stored.
Remember, the offchain portion of the metadata includes things like the image URI as well as additional information like the name and description of the NFT. While you can technically include anything you'd like in this JSON object, in most cases, you should follow the NFT standard to ensure compatibility with wallets, programs, and applications.
To create the metadata, use the uploadMetadata method provided by the SDK.
This method accepts a metadata object and returns a URI that points to the
uploaded metadata.
const { uri } = await metaplex.nfts().uploadMetadata({
  name: "My NFT",
  description: "My description",
  image: imageUri,
});
Create the NFT #
After uploading the NFT's metadata, you can finally create the NFT on the
network. The Metaplex SDK's create() method allows you to create a new NFT
with minimal configuration. This method will create the mint account, token
account, metadata account, and master edition account for you. The data provided
to this method will represent the onchain portion of the NFT metadata. You can
explore the SDK to see all the other input optionally supplied to this method.
const { nft } = await metaplex.nfts().create(
  {
    uri: uri,
    name: "My NFT",
    sellerFeeBasisPoints: 0,
  },
  { commitment: "finalized" },
);
This method returns an object containing information about the newly created
NFT. By default, the SDK sets the isMutable property to true, allowing for
updates to be made to the NFT's metadata. However, you can choose to set
isMutable to false, making the NFT's metadata immutable.
Update the NFT #
If you've left isMutable as true, you may update your NFT's metadata. The
SDK's update method allows you to update both the onchain and offchain
portions of the NFT's metadata. To update the offchain metadata, you'll need to
repeat the steps of uploading a new image and metadata URI (as outlined in the
previous steps), then provide the new metadata URI to this method. This will
change the URI that the onchain metadata points to, effectively updating the
offchain metadata as well.
const nft = await metaplex.nfts().findByMint({ mintAddress });

const { response } = await metaplex.nfts().update(
  {
    nftOrSft: nft,
    name: "Updated Name",
    uri: uri,
    sellerFeeBasisPoints: 100,
  },
  { commitment: "finalized" },
);
Note that any fields you don't include in the call to update will stay the
same, by design.
Add the NFT to a collection #
A
Certified Collection
is an NFT that individual NFTs can belong to. Think of a large NFT collection
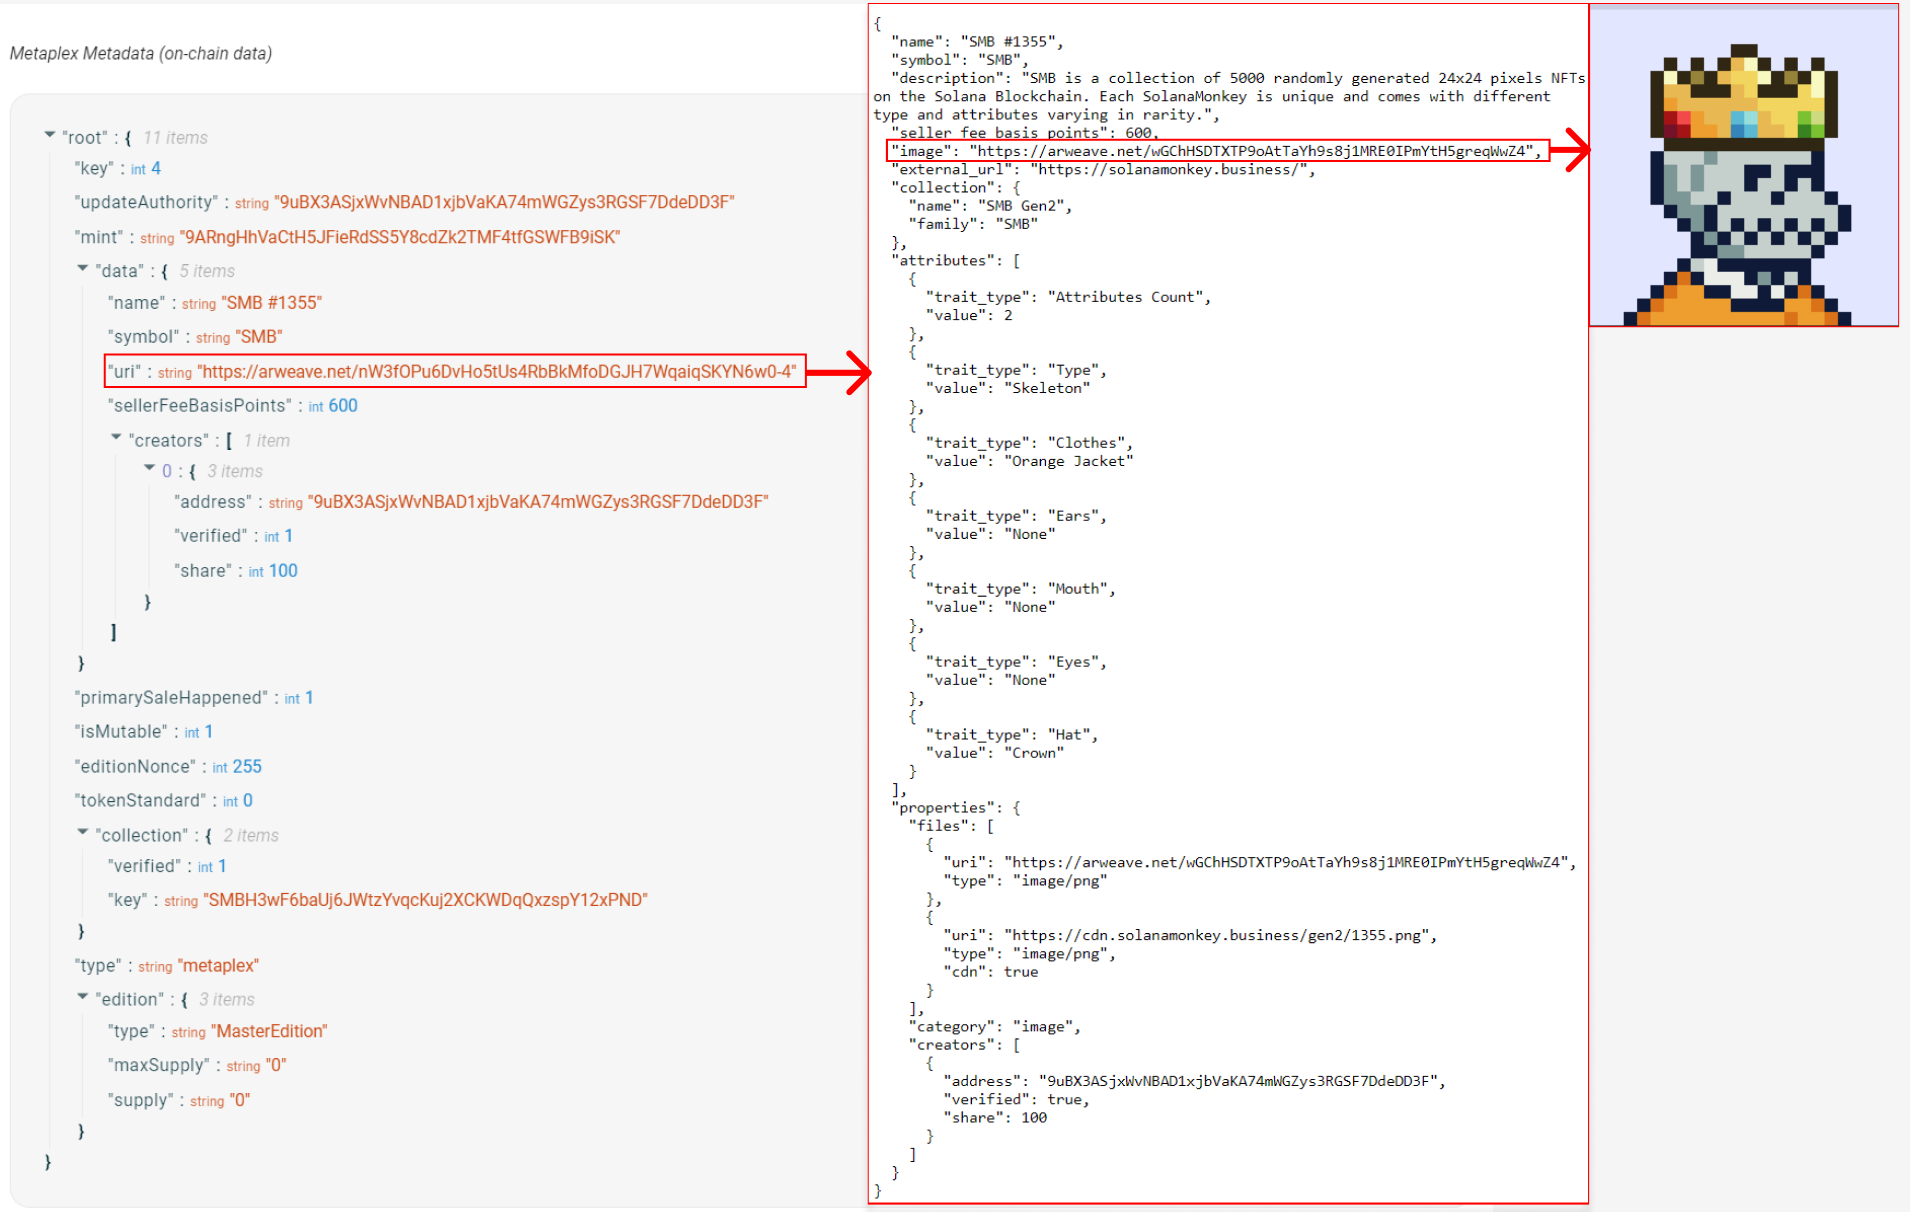
like Solana Monkey Business. If you look at an individual NFT's
Metadata
you will see a collection field with a key that points to the
Certified Collection
NFT.
Simply put, NFTs that are part of a collection are associated with another NFT
that represents the collection itself.
Certified collections are important because they mean the collection owner has verified that each NFT actually belongs to the collection!
To add an NFT to a collection, first, the Collection NFT has to be created. The
process is the same as before, except you'll include one additional field on our
NFT Metadata: isCollection. This field tells the token program that this NFT
is a Collection NFT.
const { collectionNft } = await metaplex.nfts().create(
  {
    uri: uri,
    name: "My NFT Collection",
    sellerFeeBasisPoints: 0,
    isCollection: true,
  },
  { commitment: "finalized" },
);
You then list the collection's Mint Address as the reference for the
collection field in our new Nft.
const { nft } = await metaplex.nfts().create(
  {
    uri: uri,
    name: "My NFT",
    sellerFeeBasisPoints: 0,
    collection: collectionNft.mintAddress,
  },
  { commitment: "finalized" },
);
When you checkout the metadata on your newly created NFT, you should now see a
collection field like so:
"collection":{
  "verified": false,
  "key": "SMBH3wF6baUj6JWtzYvqcKuj2XCKWDqQxzspY12xPND"
}
The last thing you need to do is verify the NFT. This effectively just flips the
verified field above to true, but it's incredibly important. This is what lets
consuming programs and apps know that your NFT is in fact part of the
collection. You can do this using the verifyCollection function:
await metaplex.nfts().verifyCollection({
  mintAddress: nft.address,
  collectionMintAddress: collectionNft.address,
  isSizedCollection: true,
});
Lab #
In this lab, we'll go through the steps to create an NFT using the Metaplex SDK, update the NFT's metadata after the fact, and then associate the NFT with a collection. By the end, you will have a basic understanding of how to use the Metaplex SDK to interact with NFTs on Solana.
Part 1: Creating an NFT collection #
To begin, make a new folder and install the relevant dependencies:
npm i "@solana/web3.js" "@solana-developers/helpers "@metaplex-foundation/js"Then create a file called create-metaplex-collection.ts, and add our imports:
import { Connection, clusterApiUrl, LAMPORTS_PER_SOL } from "@solana/web3.js";
import {
  getKeypairFromFile,
  airdropIfRequired,
} from "@solana-developers/helpers";
import {
  Metaplex,
  keypairIdentity,
  irysStorage,
  toMetaplexFile,
} from "@metaplex-foundation/js";
import { readFileSync } from "fs";
Connect to devnet, load a user and Airdrop some SOL if needed:
// create a new connection to the cluster's API
const connection = new Connection(clusterApiUrl("devnet"));

// initialize a keypair for the user
const user = await getKeypairFromFile();

await airdropIfRequired(
  connection,
  user.publicKey,
  1 * LAMPORTS_PER_SOL,
  0.1 * LAMPORTS_PER_SOL,
);

console.log("Loaded user:", user.publicKey.toBase58());
Connect to Metaplex and Irys:
// metaplex set up
const metaplex = Metaplex.make(connection)
  .use(keypairIdentity(user))
  .use(
    irysStorage({
      address: "https://devnet.irys.xyz",
      providerUrl: "https://api.devnet.solana.com",
      timeout: 60000,
    }),
  );
Add the data we want in for our Collection:
const collectionNftData = {
  name: "TestCollectionNFT",
  symbol: "TEST",
  description: "Test Description Collection",
  sellerFeeBasisPoints: 100,
  imageFile: "success.png",
  isCollection: true,
  collectionAuthority: user,
};
Upload the offchain metadata to irys:
// Load file into Metaplex
const buffer = readFileSync(collectionNftData.imageFile);
const file = toMetaplexFile(buffer, collectionNftData.imageFile);

// upload image and get image uri
const imageUri = await metaplex.storage().upload(file);
console.log("image uri:", imageUri);

// upload metadata and get metadata uri (off chain metadata)
const uploadMetadataOutput = await metaplex.nfts().uploadMetadata({
  name: collectionNftData.name,
  symbol: collectionNftData.symbol,
  description: collectionNftData.description,
  image: imageUri,
});

const collectionUri = uploadMetadataOutput.uri;
console.log("Collection offchain metadata URI:", collectionUri);
Then actually make the collection:
// create a collection NFT using the URI from the metadata
const createNftOutput = await metaplex.nfts().create(
  {
    uri: collectionUri,
    name: collectionNftData.name,
    sellerFeeBasisPoints: collectionNftData.sellerFeeBasisPoints,
    symbol: collectionNftData.symbol,
    isCollection: true,
  },
  { commitment: "finalized" }
);

const collectionNft = createNftOutput.nft;

console.log(
  `Collection NFT: https://explorer.solana.com/address/${collectionNft.address.toString()}?cluster=devnet`
);

console.log(`Collection NFT address is`, collectionNft.address.toString());

console.log("✅ Finished successfully!");
Run the file with:
npx esrun create-metaplex-nft-collection.tsThe output should look like this:
% npx esrun create-metaplex-nft-collection.ts
Loaded user: 4DRi8LxWhAWf9LwUuyb3Rz4Y4USEKzjdvQBWTyrkJtwg
image uri: https://arweave.net/_3vbKzFO7zcfMkFaVdhorntkPHDqz4YNTyf_9lrGw1c
Collection offchain metadata URI: https://arweave.net/Jw29lMkHp-PIxddEuLFkavdOTP1bJ9MeXTu-QqY3qTM
Collection NFT: https://explorer.solana.com/address/8dP75EWHnYAc6pgeiToXtE66qEaHx1PcoetZpmnAQeAp?cluster=devnet
Collection NFT address is 8dP75EWHnYAc6pgeiToXtE66qEaHx1PcoetZpmnAQeAp
✅ Finished successfully!
Congratulations! You've created a Metaplex Verified Collection. Check this out on Solana Explorer using the URL above. If you have any trouble, try and fix it yourself, but if you need to you can also check out the solution code.
We'll use the collection NFT address in the next step.
2. Creating a Metaplex NFT inside the collection #
We'll now make a Metaplex NFT that's a member of the collection we just made.
Make a new file called create-metaplex-nft.ts. The setup for this will look
the same as the previous file, with slightly different imports:
import {
  Connection,
  clusterApiUrl,
  PublicKey,
  LAMPORTS_PER_SOL,
} from "@solana/web3.js";
import {
  getKeypairFromFile,
  airdropIfRequired,
} from "@solana-developers/helpers";
import {
  Metaplex,
  keypairIdentity,
  irysStorage,
  toMetaplexFile,
} from "@metaplex-foundation/js";
import { readFileSync } from "fs";

// create a new connection to the cluster's API
const connection = new Connection(clusterApiUrl("devnet"));

// initialize a keypair for the user
const user = await getKeypairFromFile();

await airdropIfRequired(
  connection,
  user.publicKey,
  1 * LAMPORTS_PER_SOL,
  0.1 * LAMPORTS_PER_SOL,
);

console.log("Loaded user:", user.publicKey.toBase58());

// metaplex set up
const metaplex = Metaplex.make(connection)
  .use(keypairIdentity(user))
  .use(
    irysStorage({
      address: "https://devnet.irys.xyz",
      providerUrl: "https://api.devnet.solana.com",
      timeout: 60000,
    }),
  );
Now let's tell Metaplex our collection, and the NFT we want to make:
// Substitute in your collection NFT address from create-metaplex-nft-collection.ts
const collectionNftAddress = new PublicKey("YOUR_COLLECTION_NFT_ADDRESS_HERE");

// example data for a new NFT
const nftData = {
  name: "Name",
  symbol: "SYMBOL",
  description: "Description",
  sellerFeeBasisPoints: 0,
  imageFile: "solana.png",
};
We can then put out files into Irys:
// Load the file into Metaplex
const buffer = readFileSync(nftData.imageFile);
const file = toMetaplexFile(buffer, nftData.imageFile);

// upload image and get image uri
const imageUri = await metaplex.storage().upload(file);
console.log("image uri:", imageUri);

// upload metadata and get metadata uri (off chain metadata)
const uploadMetadataOutput = await metaplex.nfts().uploadMetadata({
  name: nftData.name,
  symbol: nftData.symbol,
  description: nftData.description,
  image: imageUri,
});

const metadataUri = uploadMetadataOutput.uri;
And then create an NFT using the URI from the metadata:
const createNftOutput = await metaplex.nfts().create(
  {
    uri: metadataUri, // metadata URI
    name: nftData.name,
    sellerFeeBasisPoints: nftData.sellerFeeBasisPoints,
    symbol: nftData.symbol,
    collection: collectionNftAddress,
  },
  { commitment: "finalized" },
);
const nft = createNftOutput.nft;

console.log(
  `Token Mint: https://explorer.solana.com/address/${nft.address.toString()}?cluster=devnet`,
);
Finally let's verify our mint as being part of our collection. This makes it so
the verified field in the onchain metadata is set to true, so consuming
programs and apps can know for sure that the NFT in fact belongs to the
collection:
await metaplex.nfts().verifyCollection({
  // Verify our collection as a Certified Collection
  // See https://developers.metaplex.com/token-metadata/collections
  mintAddress: nft.mint.address,
  collectionMintAddress: collectionNftAddress,
  isSizedCollection: true,
});

console.log(`Created NFT address is`, nft.address.toString());

console.log("✅ Finished successfully!");
Run npx esrun create-metaplex-nft.ts. If all goes well, you will see the
following:
% npx esrun create-metaplex-nft.ts
Loaded user: 4DRi8LxWhAWf9LwUuyb3Rz4Y4USEKzjdvQBWTyrkJtwg
image uri: https://arweave.net/Z2JoDr7W4A3mWE9aTq8ex13IoPx1v1QewjVqPKPItuE
Token Mint: https://explorer.solana.com/address/HCq8ERk1PSLCuBJeWx7du4dom3YbyfKpaCWDQ3Eft6aM?cluster=devnet
Created NFT address is HCq8ERk1PSLCuBJeWx7du4dom3YbyfKpaCWDQ3Eft6aM
✅ Finished successfully!
Inspect your NFT at the address given! If you have any trouble, try and fix it yourself, but if you need to you can also check out the solution code.
Remember the NFT address, we'll use it in the next step.
3. Update the NFT #
Create a new file, called update-metaplex-nft.ts. The imports will be simila
to our previous files:
import {
  Connection,
  clusterApiUrl,
  PublicKey,
  LAMPORTS_PER_SOL,
} from "@solana/web3.js";
import {
  getKeypairFromFile,
  airdropIfRequired,
  getExplorerLink,
} from "@solana-developers/helpers";
import {
  Metaplex,
  keypairIdentity,
  irysStorage,
  toMetaplexFile,
} from "@metaplex-foundation/js";
import { readFileSync } from "fs";

// create a new connection to the cluster's API
const connection = new Connection(clusterApiUrl("devnet"));

// initialize a keypair for the user
const user = await getKeypairFromFile();

await airdropIfRequired(
  connection,
  user.publicKey,
  1 * LAMPORTS_PER_SOL,
  0.1 * LAMPORTS_PER_SOL,
);

console.log("Loaded user:", user.publicKey.toBase58());

// metaplex set up
const metaplex = Metaplex.make(connection)
  .use(keypairIdentity(user))
  .use(
    irysStorage({
      address: "https://devnet.irys.xyz",
      providerUrl: "https://api.devnet.solana.com",
      timeout: 60000,
    }),
  );
Let's load our NFT, specifying the address from the previous example, and set up what we'd like to update:
// Load the NFT using the mint address
const nftAddress: PublicKey = new PublicKey("YOUR_NFT_ADDRESS_HERE");
const nft = await metaplex.nfts().findByMint({ mintAddress: nftAddress });

// example data for updating an existing NFT
const updatedNftData = {
  name: "Updated",
  symbol: "UPDATED",
  description: "Updated Description",
  sellerFeeBasisPoints: 100,
  imageFile: "success.png",
};
We can then use Metaplex to update our NFT:
// Load the image file into Metaplex
const buffer = readFileSync(updatedNftData.imageFile);
const file = toMetaplexFile(buffer, updatedNftData.imageFile);

// Upload the new image and get image URI
const imageUri = await metaplex.storage().upload(file);
console.log("image uri:", imageUri);

// Upload new offchain metadata
const uploadMetadataOutput = await metaplex.nfts().uploadMetadata({
  name: updatedNftData.name,
  symbol: updatedNftData.symbol,
  description: updatedNftData.description,
  image: imageUri,
});

const updatedUri = uploadMetadataOutput.uri;

// update the NFT metadata
const { response } = await metaplex.nfts().update(
  {
    nftOrSft: nft,
    uri: updatedUri,
  },
  { commitment: "finalized" },
);

console.log(
  `NFT updated with new metadata URI: ${getExplorerLink(
    "transaction",
    response.signature,
    "devnet",
  )}`,
);

console.log("✅ Finished successfully!");
Run npx esrun update-metaplex-nft.ts. You should see something like:
% npx esrun update-metaplex-nft.ts
Loaded user: 4DRi8LxWhAWf9LwUuyb3Rz4Y4USEKzjdvQBWTyrkJtwg
image uri: https://arweave.net/nd6rxpoGfPmB2gTutEgnH5B76CFlDxgM6cZ7BcUmFis
NFT updated with new metadata URI: https://explorer.solana.com/tx/4eiuMFLeku7ArV5xkRTPKxBXjfjQsSVGFZimMkMaMxK1d21qptQE5kgKiuob6J852m4GuoMqcjz1ee4oy7fXVEWU?cluster=devnet
✅ Finished successfully!
Inspect the updated NFT on Solana Explorer! Just like previously, if you have any issues, you should fix them yourself, but if needed the solution code is available.
Congratulations! You've successfully learned how to use the Metaplex SDK to create, update, and verify NFTs as part of a collection. That's everything you need to build out your own collection for just about any use case. You could build a new event ticketing platform, revamp a retail business membership program, or even digitize your school's student ID system. The possibilities are endless!
Challenge #
The steps covered above for creating an NFT would be incredibly tedious to execute for thousands of NFTs in one go. Many providers, including Metaplex, Magic Eden, and Tensor have so-called 'fair launch' tools that take care of minting large quantities of NFTs and ensuring they are sold within the parameters set by their creators. Dive into fair launch platforms on the Digital Collectables page. This hands-on experience will not only reinforce your understanding of the tools but also boost your confidence in your ability to use them effectively in the future.